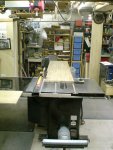
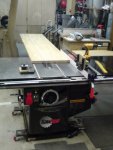
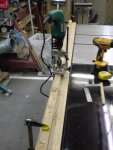
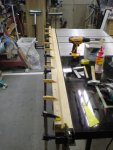
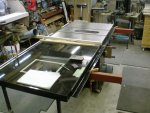
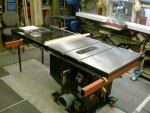
Building a Bench on the Back of the SawStop *Almost Done*

Stu,

You've got a good plan for outfeed support. You've got good support to the right and left side of the blade. But what about infeed support? When I built my saw cabinet, I set it up so I could put a piece of 3/4 ply on the opened front doors. I don't use it all the time, so it's easily removeable, but it sure does come in handy (and it never falls over like roller stands do... ;)

Thanks,

Bill
 
My bench isn't attached to the saw at all it has 4 wood legs & the top is 2" thick & about 3' x 6'. Accept that your bench will be longer I don't see a problem. Build the legs & under structure to handle it. I would use the New Yankee Workshop method of making wheels go down to move it. a hinged board on each end leg facing each other with a hinged board between the legs with 2 casters on it. You would need to have something between the legs for the hinged board to fasten to. In practice you lift the end of the bench slightly & the boards drop into place holding the board between the legs down & the caster in contact with the floor. There is a rope between the 2 boards on the legs to pull them up to set the bench on its legs just lift the end of the bench & pull on the rope & the hinged boards move inward & the middle hinged board moves upward & the legs are again in contact with the floor. If I didn't explain this well enough please ask.

I wouldn't fasten the bench to the saw at all Mine isn't & its worked just fine for several years now.

So which side of the saw are you planning to put the router in? If the left side don't build the saw table around the end make a new wing approximately 22" x what ever the depth of your saw is to replace the cast iron wing. I realize your motor door is on that side so this may not be convenient or maybe you could make the wing wider to set the router more to the left. I kinda like to stand at the router table the same way I would at a shaper I feel it gives me better control. If you extend the left wing you may not need to build the bench out & around the end of the saw. As you can see I've built my work center so that the saw , jointer & bench all fit together. The bench is at 36" tall the saw is on a riser so the bottom miter slots are at or just a little higher than the bench top & the jointer is 32" high on a cabinet at the right height to put the fence just below the bench top. All I do is pivot the in-feed table of the jointer out to clear the router table & its ready to use.
 

Attachments

  • Work center.jpg
    Work center.jpg
    43.5 KB · Views: 54
Certainly could do that, but I'm also planning on a leg vice, so for at least that leg, I'd rater have wood.

Cheers!

Ok Stu, I'm going to ask a dumb question. What is a leg vise:dunno:? Is it similar to the other Thread I've seen with the bench that uses the pipe clamps to let a board adjust up and down for support when you are working on the edges. Or can you still make the leg out of metal but for strength but wrap it in wood for your vise:D.
 
Ok Stu, I'm going to ask a dumb question. What is a leg vise:dunno:? Is it similar to the other Thread I've seen with the bench that uses the pipe clamps to let a board adjust up and down for support when you are working on the edges. Or can you still make the leg out of metal but for strength but wrap it in wood for your vise:D.


Here you go Alan.

You will notice the bottom part in the second picture the board with the holes in it goes theough a hole in the leg making it adjustable as to how thick of material you can clamp in it.You would pit a pin through the proper hole just in front of the leg to make the jaw able to close down on your material.
 

Attachments

  • Gents-workshop-11web.jpg
    Gents-workshop-11web.jpg
    49.7 KB · Views: 58
  • IMG_6758.jpg
    IMG_6758.jpg
    133.1 KB · Views: 59
Last edited:
Thanks Bart!

Yep, that is a leg vice, I'll be using a metal screw, not a wooden one.

I've always wanted one, I know it is not a versatile as a modern vice, but I'll have one of those too, so what the hey, I can build a leg vice and see if I like it, won't cost me much, and if I like it great, if I don't, no big deal

Cheers!
 
Here you go Alan.

You will notice the bottom part in the second picture the board with the holes in it goes theough a hole in the leg making it adjustable as to how thick of material you can clamp in it.You would pit a pin through the proper hole just in front of the leg to make the jaw able to close down on your material.

Thankyou very much for explaining that to me Bart:thumb:.
 
OK, I've made my first cuts on the saw for the back bench :thumb:

slab_2_b_cut.jpg
I turned the saw into it's long ripping position and set up my roller stands........
slab_cut.jpg
...... and did the cut :D

no drama at all, the saw cut this large slab with ease!

I will have to make up some kind of overhead DC for it, like most table saws, that part of the DC don't work so well :dunno:

The off cuts were then sliced into making the apron for the bench, with a back block to support the slab.
apron_hole_drilled.jpg
I used the the drill guide thing instead of wrestling the drill press out into the middle of the room.

apron_screwed_glued_clamped.jpg
Next up, I screwed, glued and clamped the support block to the inside of the apron.

I'm noticing that one thing you need to build a workbench, is a workbench :doh:

Cheers!
 
I'm working on the support tubes that I'll weld to the fence angle iron pieces, to support the bench, both when in use and when on the mobile base.

tube_support1.jpg tube_support2.jpg
I cut the tubes to length and clamped them in place to make sure I'll have clearance for the router lift and for the side access doors on the SawStop.

Bit by bit :wave:
 
Stu, just a thought but would it be better to bolt the supports to the rails? Just wonder if welding would be bad if you ever wanted to take the bench off for some reason. Maybe you can't bolt it on...just a thought out loud.
 
Stu, just a thought but would it be better to bolt the supports to the rails? Just wonder if welding would be bad if you ever wanted to take the bench off for some reason. Maybe you can't bolt it on...just a thought out loud.

Jeff took the words right out of my mouth.

If you can't make a strong enough connection to the angle iron with bolts, then you could also weld the tubes, but don't have them stick out at back. Then make MORE tubes (or boards, that slide into these tubes, and then bolt them through the tubes.

I just think that future disassembly would be a worthy goal.
 
Bolts are certainly still on the table as an option, but one thing is, when you have a MIG welder, everything looks like it needs welding :D

Plans do change, and stuff happens, so your idea of bolting things together is a good one. :thumb:
 
I hung my pieces on the saw from the bolts that hold the wings on those 2 bolts on each sidewill hold it plenty strong. In your case I would weld flat iron onto the tube & run the bolts through hole in the flat iron & through the wing & main table joints. I would never weld to the saw.:D:thumb:

Edit:

This was on my contractors saw. My bench out-feed table behind my Unisaw is free standing & the way I will make all my out-feed tables from now on. I am considering making a 12"or deeper extension with miter slots for the back of my unisaw only because I don't want slots in my bench-top & would like to raise my bench to the same height as the saw. Right now the bench is set at the bottom of the saw miter-slots so the miter gage & other items using the miter-slots slide over the bench top.


In the picture there is a joint that you can't see 12" out from the back of the saw & the rest of the table is hung from hinges on the back edge of that section. The table is 48" wide & 59" long, covered in 2 colors of laminate what can I say it was free & I didn't have enough of one color to do the whole table.
 

Attachments

  • TS Guard B.jpg
    TS Guard B.jpg
    52.2 KB · Views: 55
Last edited:
I would just bolt It on Stu like everyone else is saying. With all of the holes already in the angle, I'm sure with just a couple of tabs welded on you can use the original bolts on the front angle holding the tube for the fence.
 
Stu, I never did find that article & plans for that pull out extension, (and I have looked everywhere),:( BUT those tubes would be PERFECT to make one. Just make a couple of arms/tubes that will slide inside those you are using and connect a long piece of wood or ??? to the ends of the arms with the top of that long piece just a Little lower then the back edge of the outfeed table you are making, (so the piece you are cutting on the saw won't hang up on it if it droops a little), OR better yet, you could put a bevel on the top edge of that piece with the low side toward the saw and it would ride up on it and not hang up. I think I would make that long piece out of 1 1/2 or 2" x ? material to give a more gradual slope/bevel.
 
Last edited:
Stu again I have to thank you for starting this thread. I am learning a great deal and there are some great ideas here.

Bart thats a great idea to use the boltd on the wings with a tab.

The whole aspect of attaching a extension table to the saw has been bugging me no end. Somehow one always thinks of much more complex methods than needed.

Keep going Stu I am watching with great interest and picking up ideas.

P.S> I add this after posting

What is the price of steel like in Japan. You seem to be quick to use it but my experience here is its not cheap especially the coated stuff that you seem to use or are you buying it raw and coating it with primer?

Rob all I had was a piece of angle under each side of of the saw running front to rear sticking out a little over 12 "I welded flat metal tabs with holes in them in position so they lined up with the bolts that held the webbed wings on & just backed the bolt out & replaced it with a little longer bolt through the hole & through the wing & saw table top & replace the lock washer & nut. I did weld a piece of angle across the outer ends of the pieces bolted to the saw to which I bolted the hinges. I also had to contact glue some shim material to the angle to bring the height up so that the plywood or I think I used high density 3/4" chip board would be level with the saw top. I can understand over thinking a project I tend to do that & then back up & subtract sometimes more isn't always better.
 
Norman, I like the idea of extension tubes, I'll have to noodle that some more :D

Rob, I'm glad that you too are getting something out of this, one of the main reasons I like doing this kind of thing and sharing it online is that I too get a lot of info from others doing stuff and sharing, so I feel it is only right to pay it back when I can.

The steel is not expensive, I think I paid about $12 for each on of those tubes, they are 75mm tall, by 45mm wide and 2000mm long.

These tubes are primer coated, they are NOT the soft thin tubes you can get, they are much harder steel, thicker too, they use this stuff for structural steel in building here. They come in 4000mm lengths, but the home center cuts them to 2000mm lengths to sell them to guys like me :D

Dunno is $12 for a length like that expensive_ :dunno:

BTW, I've decided to ditch the tubes and go with some heavy duty angle iron, much the same stuff as the fence system is made from, this will be easier to bolt together, I just don't have any on hand at the moment.

Cheers!
 
Top