Dungeon Overhaul..........In Progress....

Personally Stu Lazy susan's are a waste of space. I would go with a fixed shelf to utilize all your space.

Well Drew, it is hard to reach back into a shelf that is 52" deep, that is over 4' deep you know :D

Add to that, the space is 3 1/2' in off the ground, and you might understand my problem.

Art, that was quick work! :D

WAY too nice for turning blanks!

Good idea, just the same, thanks! :thumb:
 
Stu it is just that lazy susans always have the problem of stuff falling off the back of the shelves unless you are going to totally build a round insert for them like you find in kitchen cabinets. And like you point out how deep and difficult it is to reach back there I think you will have equally difficult problems reaching the things that might fall off the back of the lazy susan. I can see that it is a difficult space to deal with.
 
OK Drew, I've never actually lived in a house with a lazy susan in the kitchen so I did not know that they are surrounded at the back, I can do that in a not quite round surround, .... hey that rhymes :D :rolleyes:

Cheers!
 
Picture

Stu,

I really like the picture attached to your name. I just clicked on the pic and it brought up a more current picture of you next to the trike pic. Sorry Stu, but the years have not been so kind to you;-)

Just kidding!

I do admire your skill as a woodworker, metal worker, logger, lumber miller (is that a word?), and moonshiner (oh wait you are ligit in that business... right?). The list could go on but I'll leave that for another day. You are one of the few people I know who is a jack of all trades but master of more than one.

Keep up the good work Stu.

Jack
 
Thank you Jack!

The only thing I think I can call myself a "Master" at is to keep trying :eek:

Last night I did a number on the Annex area and cleaned stuff up and set up some of that wire rack shelving stuff.

I got up a little early today, went to bed a bit early last night (2AM..?) and was down in the Dungeon cleaning and picking through boxes of "stuff" :rolleyes: for a few hours. Around 10 AM my lovely and helpful wife came and helped me put a bunch of stuff from the parking area into the Annex from the second hatch, boy it was nice to have that second set of hands helping out!

Then, more cleaning, and more organizing, and tossing out a bunch of junk, got three bags of garbage to hit the curb, will most likely have another two by the time I'm done.

I cannot believe it, but I'm almost out of plywood :eek: I just brought 12 sheets home last week :doh:

Need another 3 or 4, so I'll have to go out to Super Viva Home next week.

Cheers!
 
Hi Stu.

I've been disconnected for a while and not having devoted to neither to the forum nor to woodworking.:(.


Anyway, trying to cacht up I stumbled with this post and the rotative shelves problem.

Trying to add something, wich I hope hasn't been said ( I hadn't gone through all the posts) another possibility of using that space would be making two shelves as the ones depicted but one sliding in front of the other by means of a rail or some sort of wheels on a slot. In this way you could have acces to the back one where you would store less often used items, and in the front one you could put the more often used ones.

As a side effect the back shelves would be less prone to pick up dust because they would be covered by the front one.

My five cents:thumb: or the true expression says two cents?:huh:
 
Another option might be a blind corner pull out system. Not sure who you are using for your lazy susan hardware, but Rev-a-shelf makes these, as well. The advantage over a lazy susan is that the shelves pull outside of the cabinet (or corner if it is open) a bit when you rotate them, making for very easy access to what is on the shelves.
 
Thanks guys.

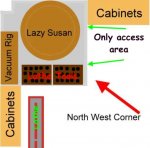
OK, a new twist to things, is that as I've been working out where everything goes in this renovation, I've come to the conclusion that I need even more space for lathe tools, so if you look at this pic.............

lazy_susan5.jpg
........maybe my problem becomes even more apparent?

I have access to the space only through the one smallish opening, thus, my thinking of a lazy-susan type of set up, with a surround on the back and sides, to keep stuff on the shelves, would be a good idea.....?

For hardware, I'm going to build that part myself, I figure some smaller casters, properly spaced should do the trick, with some sort of a (yet to be figured out) bearing in the center....:huh: :dunno:

This is not going to get done in the next week or two, so I still have time to noodle it some more.

Thanks again for the suggestions, always good to get other's input. :thumb:
 
I have access to the space only through the one smallish opening, thus, my thinking of a lazy-susan type of set up, with a surround on the back and sides, to keep stuff on the shelves, would be a good idea.....?

For hardware, I'm going to build that part myself, I figure some smaller casters, properly spaced should do the trick, with some sort of a (yet to be figured out) bearing in the center...

Is weight (you mentioned using this space for turning blanks) the reason that you plan to build the hardware yourself? I just googled for heavy duty lazy susan and the first hit was this link at rockler which lists a 23" diameter lazy susan with a 660lb capacity... oh well, I guess the $149 price is a bit of an ouch... :doh:

As for the surround. I would bet that an angled board that goes from the corner of the vacuum rig across to the opposite wall would be plenty.

But, an open shelf would still be a dust-collecting problem, especially right beside your lathe. But then, maybe you'd like to investigate coopering and build yourself a round cabinet to go in that space? :D That's one way to keep things contained!
Oh wait, you've got a vacuum rig! Forget coopering, you could just do a curved lamination!. Or just make it an Octagon with every other panel an openable one and you'd get the same effect.

Noodling is fun. I love designing. It's fun giving other people work... :rofl:
 
Stu,

Could you take some pics of yourself next to the concrete pad so we can get a better size perspective. Also, one(s) showing your reach to the walls from where you would normally stand to use the space for storage.
 
Sorry Greg, but the pics will have to wait, as the only camera I have right now that works is the one in my cell, and it is difficult to set up for a timer shot, nowhere to put a tripod :rolleyes:

On to other things....

North wall cabs, I put slab door on them......
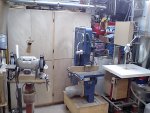
north_wall_slab_doors.JPG

No pulls at the moment, and not the best doors, but they will keep the dust out of the cabs, and things will be more organized, so I think it is a win.

I was trundling around the Dungeon today, and I realized that I've got a fair bit more room now, nothing by the standards of a lot of other shops, but for me, the extra space IS noticeable. :D

OK, on to the next little project.........

I wanted to make a rack for my Bessey clamps, I saw Glenn's step by step, but thought I could maybe do something a little quicker. Nothing against Glenn's set up, I think his is nicer than mine, but for me, this just plain worked, and worked well, I was done in about 45 minutes, maybe an hour....

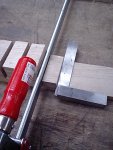
First, I put two clamps side by side, the space between the bars was 29mm, so I cut some spacer blocks at 30mm.

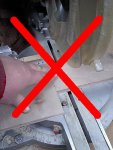
I wanted to use my SCMS to do this, but cutting small pieces like this on the SCMS is NOT a very safe thing to do, unless you do it the right way.
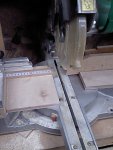
a_spacer_block.JPG
I first put a space block, the same thickness of the piece I'm cutting, to give me space between the stop block and the saw.
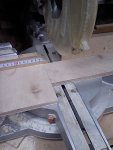
b_spacer_block_to_cut.JPG
Here is the stock to be cut.......

c_too_close.JPG
Now you have to hold the piece, but I'll NOT be using my fingers to hold it, NO WAY......
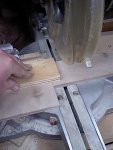
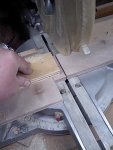
d_hold_down_block.JPG
I just use a hold down block, this hold the piece in place, and keeps my fingers safely out of the way. :thumb:

e_hold_down_cut.JPG
There, cut, nice and safe!

f_settting_block.JPG
Now I've cut enough blocks to stack 3 of the 1.5mm thick pieces of plywood, which will be enough to support these clamps. Got to make sure that the blocks are tight against the bar, and square.
I just coat them with glue and then shoot a couple of brads into the blocks to hold them while the glue dries.
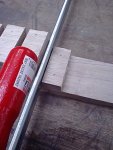
g_setting_block2.JPG
Here is the second block shot in place, make sure you shoot the brads near the outside on the first block, then closer together on the second block and finally back out near the edges on the third block.....
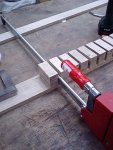
h_setting_block3.JPG
there the third block is shot in place.

Give the blocks some time to dry, and then put the quick and dirty rack on the wall somewhere.........
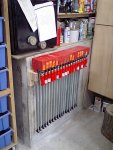
i_rack_o_besseys.JPG
Nice and simple, very little math required :D

(Yes, I know that I need to remove all them stickers on the clamps..... :rolleyes:)

Cheers!
 
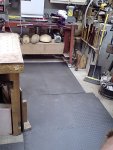
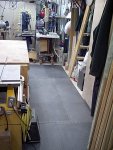
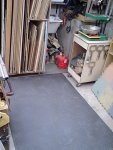
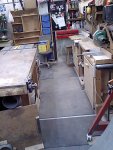
I did a really good clean tonight, and I put down the new anti-fatigue mats that I bought at Costco a while back, boy are they a LOT better than the colored ones I had, maybe twice as thick, but not near as soft, which is good, they have the cushioning you want, and the firmness too!

north_walk.JPG east_walk.JPG south_walk.JPG west_walk.JPG

Walking around the Dungeon now is real nice! :thumb:

I only bought 3 bundles of the mats, I should have got four, so I used some of the black matting I had from the start, it is good too, but not quite as nice, and the surface does not sweep as well as the new mats.

I put the mats down in areas, the largest being about 4' x 6', as I'll have to move mats to use some machines, like the jointer, and for the more through cleanings :rolleyes:

I'm getting really close to done, I still have the south wall cabinets to build, but I'm out of plywood, those 12 sheets went fast! I have to do some more electrical work, like moving the 3-phase plug for the Phoenix bandsaw, but I'm just about ready for the turners meeting on Sunday! :D :thumb::thumb:

Cheers!
 
Thanks Greg!

I still have a bunch of small things to do, I have to rebuild all the tool boards for holding my various lathe tools, live centers, etc, and I still have a lot of stuff to toss out, but I'm committed (or should be committed.. :bonkers: :rolleyes:) to keeping the Dungeon clutter free........... see how long that lasts......... :rofl: :rofl: :rofl:
 
Top