Tronxy X5Sa 3d printer build

Darren Wright

Administrator
Staff member
Messages
20,228
Location
Springfield, Missouri
A while back I gave my grandson's dad my older 3d printer so they could work together on some projects. With my current printer going down this week, I thought it might be time to get a second printer again as a backup.

I ordered this one, which has auto bed leveling and a filament sensor.

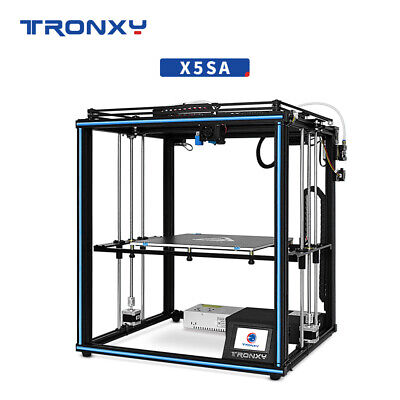
Besides being a larger bed/capacity, it is the cube type, which will allow me to enclose it for temperature control. Overall it had decent reviews, just needs the normal upgrades of better belts, and mosfet relays for added safety.

I'll document the changes I do and review it here.
 
So I've been assembling the printer the past few days and I'm pretty happy with it overall. It was well packed.
IMG_1298.jpegIMG_1299.jpeg

Given it was at the same or lower price point I paid for my original printers, which were sheet plastic frames and pieces, this one is almost all metal. There are a couple of non-structural brackets for sensors and connecting cable chain that is plastic, but all the structural parts are metal.

It's much bigger than I anticipated too, roughly 22" x 23" x 24". the print bed is about 13" x 13", with a print height around 14".
IMG_1306.jpeg

I had to re-assemble a couple of parts as the manual is pretty small print and somewhat vague in a few areas. I eventually downloaded the pdf of it on my computer so that I could zoom in to see what the illustrations were referring to. There were a lot of parts that also came with the screws and t-nuts already on them, which sped up the process. There were a lot of extra screws left over, so they must just throw in standard packages whether you need them or not.

I'm finding the temp of the bed is a bit lower than what it is reporting.
IMG_1303.jpeg IMG_1304.jpeg

The bed also comes insulated, which is nice.
IMG_1305.jpeg

I found my old octopi for my second printer and updated it. I currently have it running a print job.
IMG_1311.jpeg

I ran the calibration print and they are really close, probably need to tighten a belt for the x/y to tighten up its tolerances, though .06mm off = .002” ;)
IMG_1307.jpeg IMG_1308.jpeg
 
Last edited:
Thanks, I’ve got some tuning to do, but it’s already printing parts for itself. I was thinking I’d have to buy upgraded belts and fix the idler rollers, but they look to have kept up with doing improvements that were talked about in earlier reviews, already done.

I’ll try to document any changes or improvements I do, but may not have many at all.

Only one I really see is replacing the bed springs with silicone bushings as it has auto level.
 
Printed a support (the gray piece) for the Bowden tube to keep it standing up. It was laying over on the top belts and rubbing as the carriage moved.
IMG_1312.jpeg

My Y belt is skipping when it gets to the back left corners the tension gets loose on it. I’m going to try tightening it in that position, but suspect the belt is stretching. So may order some fiber reinforced GT2 belts.
 
I found the belt skipping was my own dumb fault, I installed that support bracket at the rear of the top rail and the carriage was running into it. :p I did order some fiber reinforced Gt2 belt already though, so probably will update those.

I ordered some silicone stand-offs for the bed to replace the springs, which should help keep the bed leveling stabile as the springs will expand/retract over time.

I don't know if this printer would have the issues of the bed and hot end connectors overheating, but I'm adding a couple of mosfet relays to inject the power at them, rather than through the control board where high current flow may heat up and cause a failure. These are kind of a safety net more than anything.
 
Top