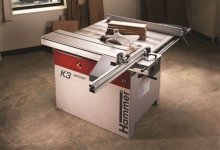
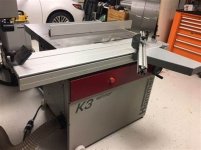
So about 12 years ago (yikes!) I had a really good bonus at work and splurged on a format sliding table saw/shaper combo from felders "lower end" Hammer line. This is a "smaller" slider although the floorspace required is still considerable (and I do still question if it could have been better used otherwise).
The basic concept is very similar to the sliding cross cut table shown here, with the main differences being more throw, the sliding table is immediately adjacent to the blade, and the crosscut fence system is built to be a lot more accurate and easy to dial in, especially for angles, there is a larger outrigger that supports sheet goods and long solid wood very well (for rips or cross cuts) which is luckily pretty easy to remove and stash sideways.
This fellow could actually have saved himself a bit of money by borrowing concepts from the format saw. The main things I can see are on the crosscut fence where mine just uses kip levers to lock it in place and the squareness is maintained by piece of flip up steel that have lock nuts to allow you to adjust them. This would require cheaper parts AND be easier to adjust/be more accurate. You could easily do the same by putting a piece of T track on the outside edge of the table for the outer kip lever to lock down on and use the same pivot on the inside he did. You'd need a blocks on the crosscut fence for the kip levers to go through which gives the added advantage of allowing you to adjust the in/out position of that fence.
The outrigger on mine also has a very accurate set of angle markings, because you're 2' or so from the pivot point the distance between degrees is a bit over 1" so it's really easy to hit your target (the one in the video they now have positive registration mine doesn't have that and a few other things seem to be upgraded). That could definitely be replicated here if you so desired without a whole lot of effort (dial it in at 45 and then step off the intermediate positions with some dividers and then mark those positions on the table with a scribe line).
The throw in my case is 79" which is sadly not quite enough to do a full sheet of plywood entirely on the slider but I can use the rip fence as a bump stop and make it work pretty well, it's still much better supported than a stock table saw. As a bonus I can also use it for straight line ripping and even do super thin stuff very safely on the sliding table with some jigs to lock the pieces down because the slider is adjacent to the blade and never have my hands anywhere near the action (example the fritz & franz jig
- I've used similar stop blocks & shop made accessory jogs to precisely cut multi-angled small pieces for things like small tap handles and also long things like tapered table legs for example). I don't think that you can get that from an accessory table like this, the traditional sled is closer but has a much shorter throw.
There are some things I don't like about it of course. The sliding table has to be a smidge above the main table (I've been meaning to adjust it down to maybe just under 2 thou, it's currently closer to 5, maybe 10.. but that's a couple days of intermittent futzing), this makes traditional ripping a bit less accurate because of the angle difference caused by one side sitting higher. The space taken is considerable. You can really easily take off the outrigger which helps but the length of the thing is substantial. The sliding table is also sort of "in the way" as OP's video noted for some amount of traditional tablesaw work.
In an ideal world I'd also have space for a traditional cabinet saw as well.. and maybe a Hammond glider trim-o saw for small stuff and ....

. I actually had this conversation w/ LOML the other night "how many stationary saws would you ideally have in a woodshop" - I counted up to 8 including two CMS (if you're doing matching angles..), two bandsaws (resaw & scroll), scroll saw, slider, cabinet saw, trim-o saw (they're so CUTE!), and rounded to 10 because I'm sure there's something else I'm not thinking of... Well we can all dream.
Newer version of the Hammer with a few upgrades:


