How to turn a "lidded bowl"

Tom Baugues

Member
Messages
2,794
Location
Lafayette, Indiana
I've never turned a bowl with a matching lid before. My question is.....is the lid usually a separate piece of wood to start with or is there ever a case where the lid is cut from the same piece as the bowl. If from the same piece, then at what point do you cut the lid piece away from the bowl piece? Or should that have been cut away before any turning on the piece ever started? I hope this makes sense.
 
I've done both from the same and separates and in multiple ways.

I've done a few like how the Mike Peace link Ted posted above. I think that works really well for larger stuff (or medium sized stuff).

For some smaller things like needle cases I'll actually just turn the lids inside and most of the outside then part it off of the end before flipping it around to fit it to the bottom (the rest of the turning is basically the same, but it saves me a chucking step...). For really small stuff you don't notice the grain mismatch from the lid being flipped the same way (at least as long as it's not crazy figured..).

You could pre-cut the lid off, but that makes getting the grain match harder.
 
I’ve made several lidded bowls, some with matching lids and some with lids of contrasting wood. If you search for clam shell bowls, YouTube will give you several choices of technique. Here’s one that I’ve used.
Thank you, Ted. My searching on YouTube had not found anyone actually cutting the lid from the same piece. This is what I wanted to see. I may attempt this process.
 
Thank you, Ted. My searching on YouTube had not found anyone actually cutting the lid from the same piece. This is what I wanted to see. I may attempt this process.
When I taught box making I started the week with lidded bowls. I supplied blanks that were 4" thick so that the lid could be turned from the same blank to match grain and color.

Of course the boxes I taught were not lidded bowls in the strictest sense. They were boxes with more or less straight sides.
 
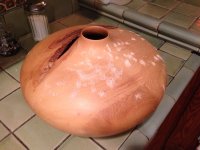
Well, this is my first attempt at a "lidded bowl". I used a piece of ASH from a tree that was cut down on my property a few years ago due to being infested with the Emerald Ash borer bug. The tree had died and had to be cut down. This piece had a lot of bug tracks throughout. I went from a 7" bowl blank to a 3.5" bowl and the tracks are still there, so I decided to go ahead and try to save what is left. If nothing else this project will be a learning project and not a finished piece. I have the project completed except for the final sanding. I'm trying to decide if I want to finish over the bug tracks or grind them out and add a colored epoxy. Anyone want to offer an opinion on how to deal with the bug tracks?
 

Attachments

  • 12-26-23 ash bowl.jpg
    12-26-23 ash bowl.jpg
    557.7 KB · Views: 13
  • thumbnail_IMG_2627.jpg
    thumbnail_IMG_2627.jpg
    347.3 KB · Views: 13
  • thumbnail_IMG_2628.jpg
    thumbnail_IMG_2628.jpg
    365.5 KB · Views: 16
  • thumbnail_IMG_2629.jpg
    thumbnail_IMG_2629.jpg
    685.6 KB · Views: 17
  • thumbnail_IMG_2630.jpg
    thumbnail_IMG_2630.jpg
    593.9 KB · Views: 16
  • thumbnail_IMG_2631.jpg
    thumbnail_IMG_2631.jpg
    679 KB · Views: 15
  • thumbnail_IMG_2632.jpg
    thumbnail_IMG_2632.jpg
    561.9 KB · Views: 14
  • thumbnail_IMG_2633.jpg
    thumbnail_IMG_2633.jpg
    554.7 KB · Views: 14
The bowl has a nice shape, but trying to get all that frass picked out will be a chore. I'd be tempted to try one of two other options. First, you could apply a really thinned coat of your finish in hopes it would soak into the frass and stabilize it, then sand and apply a normal finish coat. Second, and probably what I would end up doing, since I buy CA in quantity, would be to soak all the frassed up bug holes in thin CA and fill the big holes with ash saw dust and medium CA. Because the CA spreads to the surrounding wood and causes discoloration that's hard to sand out, I'd wet the whole surface with thin CA while filling the holes. Then I'd let it cure, sand it down and see what it looked like. The bug tracks really tell a story and can add character to a piece. Sometimes I pick out the frass and just leave the tunnels open. The M&M's really can't escape.
 
Well, my wife has already said she wants this to put jewelry in. So, I'm going to try to "class it up" and do as David has suggested and pick out all the "frass" and fill with a colored epoxy. That too would be a first, so this piece has certainly turned into a learning experience. I'll work on this over the weekend and hopefully post up some final updated photos. Thank you all for your input.
 
If you're going to go fancy and fill the frass holes (I've left them open on some pieces which has a kind of interesting if different look)... one of the crush stone or stone look-alikes might be a fun option.


Or crush your own :D
 
If you're going to go fancy and fill the frass holes (I've left them open on some pieces which has a kind of interesting if different look)... one of the crush stone or stone look-alikes might be a fun option.


Or crush your own :D
Well, I just spent an hour digging out the dust trails and now the bowl has taken on a whole new appearance. I kind of like it with all the natural "tunnels". So, I'm going back and forth as to what to do. I'll sleep on it.
 
I'm a fan of picking the bug holes clean and letting them become a feature. Be aware that sometimes the bugs outlive the tree. I have a large ash hollow form that I turned from fairly dry wood, and then finished it immediately with Formby's Tung Oil finish and Renaissance wax. Then about two years later little piles of sawdust started showing up all over the top of the piece. Never did see any of the actual bugs, but it was clear they weren't done eating dinner, lol.

Bug Problem 1 - 800.jpg
I put the hollow form in a black plastic garbage bag, sprayed the inside with Raid, and then left it outside in the hot summer sun for a few days. That seemed to have solved the problem.
 
I'm a fan of picking the bug holes clean and letting them become a feature. Be aware that sometimes the bugs outlive the tree. I have a large ash hollow form that I turned from fairly dry wood, and then finished it immediately with Formby's Tung Oil finish and Renaissance wax. Then about two years later little piles of sawdust started showing up all over the top of the piece. Never did see any of the actual bugs, but it was clear they weren't done eating dinner, lol.

View attachment 128271
I put the hollow form in a black plastic garbage bag, sprayed the inside with Raid, and then left it outside in the hot summer sun for a few days. That seemed to have solved the problem.
I've heard that a microwave can resolve the issue as well. Although you have to be sure not to warp the wood.
 
Top