Another Street Sign

Brent Dowell

Administrator
Staff member
Messages
16,600
Location
Reno NV
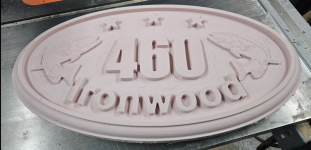
So, Last time I posted my street sign on FB, One of my acquaintances in the neighborhood said he wanted one. Well, I've seen him post about fishing on his boat on pyramid lake, so I offered to trade him a sign for a seat on his boat.

Well, Going fishing on Friday, and I'm working on a sign for him.

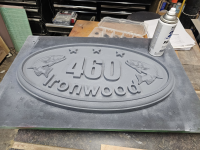
Need to work on the flat areas here. I think there was some issues with the foam flexing during the pocketing run.

Going to print up some little detail sanders and take care of that pretty quick. Not to o unhappy with it otherwise.
1703125429348.png
 
So, Last time I posted my street sign on FB, One of my acquaintances in the neighborhood said he wanted one. Well, I've seen him post about fishing on his boat on pyramid lake, so I offered to trade him a sign for a seat on his boat.

Well, Going fishing on Friday, and I'm working on a sign for him.

Need to work on the flat areas here. I think there was some issues with the foam flexing during the pocketing run.

Going to print up some little detail sanders and take care of that pretty quick. Not to o unhappy with it otherwise.

View attachment 128164
I am not familiar on how this sign is made. Can anyone post link for me please ? I would like to understand the process.
Thanks in advance and Merry Christmas and Festivus an family and good friends friends and good food
calabrese55
 
I would like to understand the process.

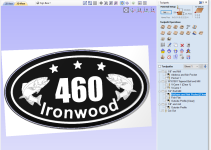
1) I use Vectric to design the sign and then to create a number of toolpaths that I will run on my cnc.
In order to reduce machining time, I use a variety of different bits depending on what is needed to be done.
I group the different toolpaths by bit type and put them in order that I will cut them. I save those tool path groups off to seperate files.
1703350344360.png
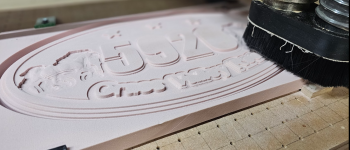
2) I run the toolpaths on my CNC to cut out the shapes, changing out the bits after running each of the toolpath files.
1703350577021.png
3) I'll then cut out a backer board from plywood with keyholes cut into it to use for hanging.
4) once that's done, I then use spray paint to prime and paint the background color(black) on the sign
1703350676918.png
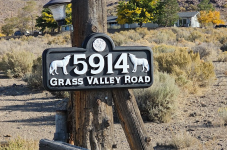
5) I'll then hand paint the details with the foreground color (White) paint.
1703350817587.png

Honestly, most of the work on these seems to be done on the computer side. Running the jobs on the CNC and painting the signs are fairly straight forward.
 
1) I use Vectric to design the sign and then to create a number of toolpaths that I will run on my cnc.
In order to reduce machining time, I use a variety of different bits depending on what is needed to be done.
I group the different toolpaths by bit type and put them in order that I will cut them. I save those tool path groups off to seperate files.
View attachment 128187
2) I run the toolpaths on my CNC to cut out the shapes, changing out the bits after running each of the toolpath files.
View attachment 128188
3) I'll then cut out a backer board from plywood with keyholes cut into it to use for hanging.
4) once that's done, I then use spray paint to prime and paint the background color(black) on the sign
View attachment 128189
5) I'll then hand paint the details with the foreground color (White) paint.
View attachment 128190

Honestly, most of the work on these seems to be done on the computer side. Running the jobs on the CNC and painting the signs are fairly straight forward.
Thank you Brent for the detail. One last question please what is the actual sign material is it foam board or something similar ?
Thanks again for you contribution .
calabrese55
 
Thank you Brent for the detail. One last question please what is the actual sign material is it foam board or something similar ?
Thanks again for you contribution .
calabrese55
It's a material called 'HDU'

"High Density Polyurethane (HDU) is tough, weather resistant and lightweight (15lbs/ft2), Its closed cell structure makes it completely waterproof which allows for the application of almost any paint finish. HDU can withstand all weather conditions and is ideal for the exterior applications including custom sign fabrication. HDU can be routed, carved, and sandblasted more efficiently than most wood substrates on the market."

It really machines like butter on a CNC machine
Thank you Brent,
That info helps a bunch. I do not have a CNC (yet) but have an idea i can use that material for a bunch of stuff not the least of which will be making cores for resin castings I mess with and as a replacement for the typical insulation foam boards I use to build wing panels for my R/C airplanes .
Thank you again for sharing.
calabrese55
 
That info helps a bunch. I do not have a CNC (yet) but have an idea i can use that material for a bunch of stuff not the least of which will be making cores for resin castings I mess with and as a replacement for the typical insulation foam boards I use to build wing panels for my R/C airplanes .

It can be a bit pricey. If you can find a local supplier, that'd probably be the best way to go. I got my first boards from https://www.interstatehdu.com/collections/high-density-urethane. It comes in a number of different densities/weights.

I used the 15# for my signs, but probably should have gone a little heavier. As far as airplane wings go, I would think it's not very impact resistant, but I now that you mention it, I wonder how the 4# stuff would work. Interesting idea. Keep us posted of you use the material!
 
Thanks Brent for the link.
Cutting R/C airplane wings is a common method. A typical example here
Typically done with templates to guide a hot wire. Spars are added for strength and balsa sheeting all over for skin stressing basically makes a surfboard stiff wing. I have been cutting foam for many years with insulating foam. Two thirty six wing halves joined at the center easily make a finished wing with a six foot span.
As far as the casting core piece goes I think with the way the HDU stuff looks like it tools it could be of value in using it to expedite a hollow core turned vase or bowl cast in resin. The typical insulation stuff just will not allow the tooling part.
Thanks again for the link.
calabrese55
 
I've been building and flying, and crashing, RC planes since the early 80's lol. I've got a few foam wing planes. Never made the wings myself but have seen the and researched the hot wire cutting cnc machines they have. Fascinating stuff.
 
I've been building and flying, and crashing, RC planes since the early 80's lol. I've got a few foam wing planes. Never made the wings myself but have seen the and researched the hot wire cutting cnc machines they have. Fascinating stuff.
Love the hobby. I started crashing in 1972 which is the reason I learned to make foam wings :ROFLMAO:
calabrese55
 
Top