
- Messages
- 37,716
- Location
- ABQ NM
I decided the new drill press needed a bigger table. I've admired the older Woodpecker drill press tables made of phenolic covered plywood, but they've discontinued them and are selling Formica-covered MDF tables instead. At 16" x 23" it's also a bit smaller than I wanted. So I decided to buy the Woodpeckers hardware and make my own table. I also decided to use some t-track I had laying around to fasten the table to the cast iron table on the drill press. That would give me a handy way to adjust the location of the table in relation to the bit.
I didn't feel like applying my own laminate, so I used some 3/4" melamine-covered particle board I had laying around. It's not nearly as stout as Formica and MDF (or plywood), but the price was right and the hassle factor was low. I glued two pieces together to make a 1 1/2" thick table, so I'd have enough thickness to accommodate the t-tracks. I trimmed the edges with some 3/4" mahogany that I'd bought a couple years ago, and had now warped to the point that it was only good for relatively short pieces. Nothing fancy, just using up old stock.
Up until this point, the project was going smoothly. I cut the two pieces of particle board EXACTLY the same size, and managed to get them glued (with contact cement) so well lined up that I didn't have to dress the edges before applying the trim. Loving the Incra setup on the table saw. The trim work went without a hitch, too. Then the fun started.
Next it was time to route the stopped dadoes for the fence t-tracks. Using the router table (again with the Incra rig), I routed the first dado perfectly. I was really loving the Incra. Knowing how perfect it was, I made a couple marks on the Incra scale, slid things over and routed the second dado. Turned it over to check the fit, and the dado was 3/8" too wide. Coincidentally, I was using a 3/8" straight bit in the router. Yep, I'd forgotten to subtract the width of the bit when I marked the Incra scale. After a few bad words were spoken, I decided I'd make the other dado the same oversized width, then use more scrap mahogany to fill the gaps. Might actually look OK, I says to myself. So I flip the tabletop over again and make the extra cut to enlarge the narrower (correct) dado.
After calming down, I decided to route the dadoes for the t-track on the bottom of the table. This time I was doubly sure to calculate the width of the bit when I set up the fence. Measured a couple times just to be sure, then turned on the router and made the first pass. It was about then that I realized I'd not turned the tabletop over. I'd just cut another dado in the TOP of the piece, not the bottom. Additional bad words were said. I believe I even made references to someone's mother that I shouldn't have. At that point, I figured I'd once again be filling the dadoes with scrap mahogany, so I went ahead and routed a matching dado on the opposite side of the top. Then I turned the darned thing over and made the dadoes where I needed them to be.
I was able to finish up the rest of the project without any other major mistakes, but I added another night or two's worth of work to what should have been a simple little project. In the end, the table is very serviceable, just not real pretty. The melamine is cheap and thin, and I'll likely scratch it up pretty quickly with use. I consoled myself with the fact that it was mostly made from scrap, and if I ever want a nicer one, I can at least re-use the hardware.
Anyway, enough sob story. Here's some pics...

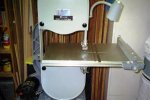
The table is 25 1/2" x 19 1/2", and the dual t-tracks for the fence are 15 3/4" long. The fence itself is 36" long. I intentionally made the sacrificial insert in the middle off-center, so I can rotate it four times per side before I have to replace it. (Plus, I can move the table around easily to hit fresh spots on the insert, due to the t-tracks on the bottom.) The hold downs work great for holding my drill press vise onto the table, too.

The fence and the tracks it rides on are laser engraved with 1/16" increments. I also got a couple of flip-stops to go with. Don't know how useful the markings will be, but I have already made use of the stops. As a bonus, they also fit my Incra gear.

Here's a shot of the t-tracks on the bottom. They were leftovers from another project, and about 1 1/2" shorter than the table width. Still plenty long for what I needed, just not nice and flush with the edges. The bottom tracks were screwed and epoxied. You can also see the holes for the screws that hold the tracks on the top. Those are just held in place with oval nuts and machine screws, so they are removable (and reusable on another table down the road.)

The bottom of my original table has castings to accommodate "outrigger" stock supports. Of course these castings (on opposite corners) were right in the way of the knobs holding the new table on, so I turned a couple of standoffs to give the knobs room to turn.

As I said, it's functional, just not pretty. And I really like having all that real estate to work on.
I didn't feel like applying my own laminate, so I used some 3/4" melamine-covered particle board I had laying around. It's not nearly as stout as Formica and MDF (or plywood), but the price was right and the hassle factor was low. I glued two pieces together to make a 1 1/2" thick table, so I'd have enough thickness to accommodate the t-tracks. I trimmed the edges with some 3/4" mahogany that I'd bought a couple years ago, and had now warped to the point that it was only good for relatively short pieces. Nothing fancy, just using up old stock.
Up until this point, the project was going smoothly. I cut the two pieces of particle board EXACTLY the same size, and managed to get them glued (with contact cement) so well lined up that I didn't have to dress the edges before applying the trim. Loving the Incra setup on the table saw. The trim work went without a hitch, too. Then the fun started.
Next it was time to route the stopped dadoes for the fence t-tracks. Using the router table (again with the Incra rig), I routed the first dado perfectly. I was really loving the Incra. Knowing how perfect it was, I made a couple marks on the Incra scale, slid things over and routed the second dado. Turned it over to check the fit, and the dado was 3/8" too wide. Coincidentally, I was using a 3/8" straight bit in the router. Yep, I'd forgotten to subtract the width of the bit when I marked the Incra scale.
After a few bad words were spoken, I decided I'd make the other dado the same oversized width, then use more scrap mahogany to fill the gaps. Might actually look OK, I says to myself. So I flip the tabletop over again and make the extra cut to enlarge the narrower (correct) dado.After calming down, I decided to route the dadoes for the t-track on the bottom of the table. This time I was doubly sure to calculate the width of the bit when I set up the fence. Measured a couple times just to be sure, then turned on the router and made the first pass. It was about then that I realized I'd not turned the tabletop over. I'd just cut another dado in the TOP of the piece, not the bottom.
Additional bad words were said. I believe I even made references to someone's mother that I shouldn't have. At that point, I figured I'd once again be filling the dadoes with scrap mahogany, so I went ahead and routed a matching dado on the opposite side of the top. Then I turned the darned thing over and made the dadoes where I needed them to be.I was able to finish up the rest of the project without any other major mistakes, but I added another night or two's worth of work to what should have been a simple little project. In the end, the table is very serviceable, just not real pretty. The melamine is cheap and thin, and I'll likely scratch it up pretty quickly with use. I consoled myself with the fact that it was mostly made from scrap, and if I ever want a nicer one, I can at least re-use the hardware.
Anyway, enough sob story. Here's some pics...
The table is 25 1/2" x 19 1/2", and the dual t-tracks for the fence are 15 3/4" long. The fence itself is 36" long. I intentionally made the sacrificial insert in the middle off-center, so I can rotate it four times per side before I have to replace it. (Plus, I can move the table around easily to hit fresh spots on the insert, due to the t-tracks on the bottom.) The hold downs work great for holding my drill press vise onto the table, too.
The fence and the tracks it rides on are laser engraved with 1/16" increments. I also got a couple of flip-stops to go with. Don't know how useful the markings will be, but I have already made use of the stops. As a bonus, they also fit my Incra gear.
Here's a shot of the t-tracks on the bottom. They were leftovers from another project, and about 1 1/2" shorter than the table width. Still plenty long for what I needed, just not nice and flush with the edges. The bottom tracks were screwed and epoxied. You can also see the holes for the screws that hold the tracks on the top. Those are just held in place with oval nuts and machine screws, so they are removable (and reusable on another table down the road.)
The bottom of my original table has castings to accommodate "outrigger" stock supports. Of course these castings (on opposite corners) were right in the way of the knobs holding the new table on, so I turned a couple of standoffs to give the knobs room to turn.
As I said, it's functional, just not pretty. And I really like having all that real estate to work on.


 ,
,

 .
.

